Material:
Tubes : Internet..
Thanks to the tubsters for the beautiful material
Respect their work, don't change anything about the tubes and don't say they
are your tubes
Without them, this lesson would not be possible.
The copyright belongs to the original artist. Leave credit with the creator.
Plugins :
Graphics Plus/ Cross Shadow
Material
Let's start the lesson
Take me with you, I'll show you where
you left off.

Open the tubes in a map of your choice or in the program PSP.
Save your work regularly!
TIP: Duplicate your tubes and work with the copies
1. Open easter_les31_Color palette
2. Open alpha channel _les31_pas
3. Duplicate the IMAGE ( SHIFT + D )
Close the original we continue
working on the copy.
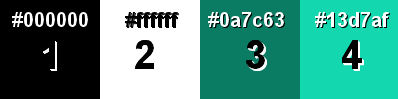
4. Material Properties: Set your Foreground color to color 3
Flood Fill
Tool: Fill the layer with color 3
5. Open Image: AG_1les31
6. Edit-Copy
7. Activate your work. .
8. Edit-Paste as new layer
9. Layers- New Raster Layer
10. Selections/Load/Save Selection/Load Selection from Alpha Channel -
Selection 1
11. Flood Fill Tool: Fill the selection with color 4
12. Selections- Modify-Contract 15 Px
13. Flood Fill Tool: Fill the
selection with color 3
14. Selections- Modify-Contract 2 Px
15. Flood Fill Tool: Fill the
selection with color 2
16. Selections- Modify-Contract 10 Px
17. Flood Fill Tool: Fill the selection with color 3
18. Effects-Plugins-Graphics plus- Cross Shadow-using the default settings
19.
Effects-3D-Effects-Buttonize with these settings: 19, 3, 75 Color 2
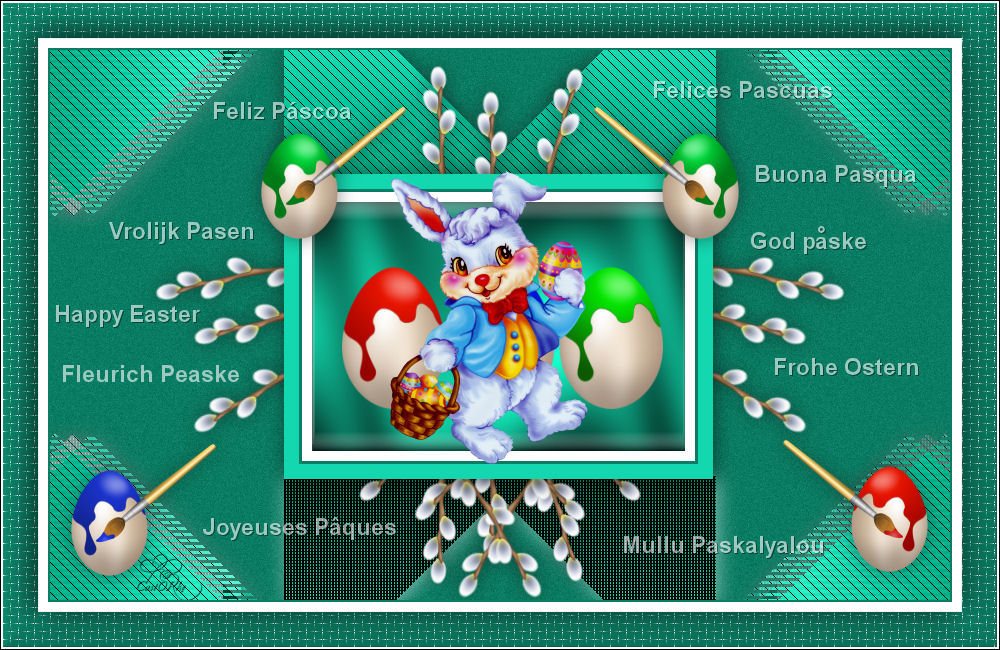
20. Selections- Deselect All
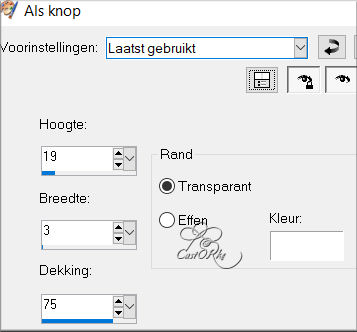
21. Effects- 3D-Effects-Drop Shadow with these settings: 2, 2, 50, 30 Color 1
.
22. Open the Tube : castorke_pas_les31_deco
23. Edit-Copy
24. Activate your work. .
25. Edit-Paste as new layer
26. Layers- Arrange- Move Down
27. Activate the top of the layer palette (Raster 3)
28. Open the Tube deco1_les31
29. Edit-Copy
30. Activate your work. .
31. Edit-Paste as new layer
32. Effects- 3D-Effects-Drop Shadow with these settings: 2, 2, 50, 30 Color
1
33. Open Tube : Easter_Bunny_with_Egg_Basket_Clipart (1)
34. Edit-Copy
35. Activate your work. .
36. Edit-Paste as new layer
37. Do not move it is in the right place
38. Effects- 3D-Effects-Drop
Shadow with these settings: 2, 2, 50, 30 Color 1
39. Open Tube: deco2_les31
40. Edit-Copy
41. Activate your work. .
42. Edit-Paste as new layer
43. Put the tube in the right place ( see finished image )
44. Open deco3_les31
45. Edit-Copy
46. Activate your work. .
47. Edit-Paste as new layer
48. Put the tube in the right place or of your own choice
49. Open the Tube : deco5_les31
50. Edit-Copy
51. Activate your work. .
52. Edit-Paste as new layer
53. Place the tube at the bottom left.
54. Layers- Duplicate
55. Pick Tool: (K) on your keyboard -Enter these parameters on the
Toolbar
Position X 599 -Position Y 45
56. Layers- Duplicate
57. Image - Mirror - Mirror Horizontal (Image - Mirror in older versions of
PSP)
58. Open the Tube : castorke_pas_les31_tekst
59 Close the bottom layer of this text
60.Edit- Copy Special-Copy Merged
61.
Activate your work. .
62. Edit-Paste as new layer
63. Layers- Properties-Reduce the Opacity of this layer to 60 %
64.
Add you watermark on new layer
65. Image - Add borders-Symmetric
checked: 1 Pixel -Color 3
66. Image - Add borders-Symmetric checked: 10 Pixels -Color 2
67. Selections- Select All.
68. Image - Add borders-Symmetric checked: 35 Pixels -Color 3
69. Selections-Invert
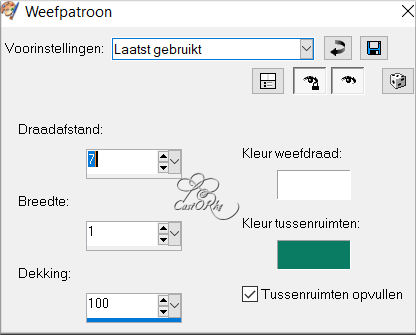
70. Effects-Texture Effects-Weave with these
settings:
Weave color - Color 2
Gap color- Color 3
7 - 1 - 100
71. Adjust-Sharpness-Sharpen
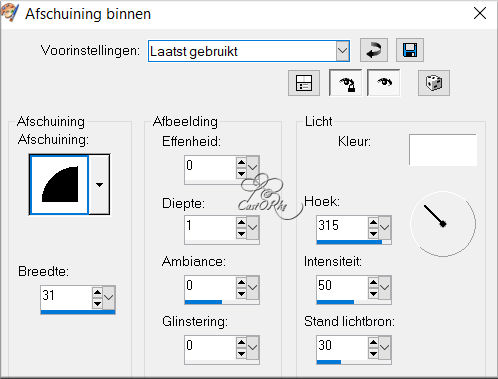
72 Effects-3D-Effects-Inner Bevel with these settings: Nr 2 Color 2
73 Selections-Invert
74. Effects- 3D-Effects-Drop Shadow with these
settings: 0, 0, 75, 50 Color 1
75. Selections- Deselect All
76. Image - Add borders-Symmetric checked: 1 Pixel -Color 2
77. Image - Add borders-Symmetric checked: 1 Pixel -Color 1
78. Save as JPG
I hope you enjoyed this lesson
I am curious to see your work.
Please send it to me in original size.
To see your achievements here . H