Psp Div3_lesson 229
Translated by Marion into French, English, German
Thank you kindly
Click on the flag for translation.
*** VM Toolbox/ Seamless Tile, Medhi Sorting Tiles , WavyLab1.1
*** Import this filter into Unlimited 2

Take me with you, I'll show you where you left off.
![]()
Save your work regularly !

Open the color palette lesson 229

1.Color 1 (FG-color #ffde0), Color 2 ( BG-color #1e2028) ,
Color 3 #da9b75, Color 4 #ecb8eb , Color 5 #82787a , Color 6 #000000
2. File-Open a new transparent Image in this size :. 900 x 600 Pixels
3. Effects/ Plugins/ Mehdi/ WavyLab1.1 use the settings below
Linear 4, 45, 0

4. Effects/Plugins/ Mehdi/ Sorting tiles 300-500, block398, crossed with these settings

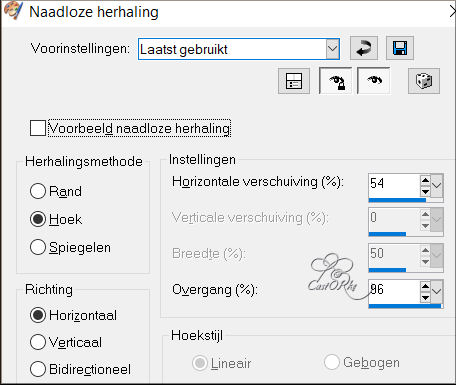
5. Effects- Image Effects- Seamless Tiling use the settings below
Corner , Horizontal , H.offset 54, Transition 96
6. Layers- Duplicate
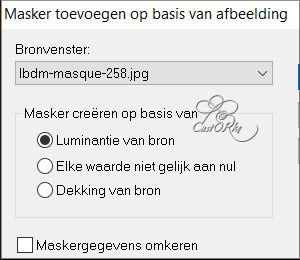
7. Open Mask: lbdm-masque-258 and minimize.
8. Layers- New Maske Layer-From Image and select Mask
9. Layers- Merge- Merge Group.
10. Adjust- Sharpness Sharpen More
11. Effects- 3D- Effects- Drop Shadow with these settings: 1, 1, 100, 0 Color black 6
12. Layers-Properties-Set the Blend Mode to " Difference"
13. Layers- New Raster Layer
14. Flood Fill Tool-Fill the layer with the Foregroud color1
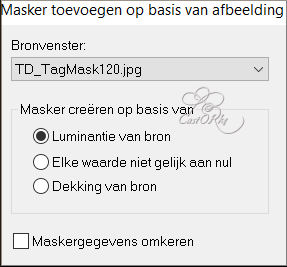
15. Open Mask: TD_TagMask120 and minimize.
16. Layers- New Maske Layer-From Image and select Mask
17. Layers- Merge- Merge Group.
18. Adjust- Sharpness Sharpen More
19. Effects- 3D- Effects- Drop Shadow with these settings: 1, 1, 100, 0 Color black 6
20. Layers-Properties-Set the Blend Mode to " Luminance (legacy) "
21. Pick Tool: (K) on your keyboard -Enter these parameters on the toolbar
Position X - (min) -1, Position Y 12
22. Open the Tube "les229_deco "
23. Edit-Copy
24. Activate your work
25. Edit - Paste as new layer
26. Pick Tool: (K) on your keyboard -Enter these parameters on the toolbar
Position X -1, Position Y 10
27. Open the Tube "Grisi_Woman_648 "
28. Edit-Copy
29. Activate your work
30. Edit - Paste as new layer
31. Image Resize 60%
Resize all layers NOT checked
32. Pick Tool: (K) on your keyboard -Enter these parameters on the toolbar
Position X 524, Position Y 28
33. Effects- 3D- Effects- Drop Shadow with these settings: 0, 0, 30, 0 Color black 6
34. Open the Tube "homme85-coly "
35. Edit-Copy
36. Activate your work
37. Edit - Paste as new layer
38. Image Resize 1 x 75% and 1 x85%
39. Remove the name.
40. Effects- 3D- Effects- Drop Shadow with these settings: 0, 0, 30, 0 Color black 6
41. Layers- Properties/ Reduce the Opacity of this layer to 42 %
42. Pick Tool: (K) on your keyboard -Enter these parameters on the toolbar
Position X 166, Position Y 78
43. Open "Miz_NewYear21_el 7"
44. Edit/Copy
45. Activate your work
46. Edit - Paste as new layer
47. Image Resize 1 x 50% and 1 x 80%
48. Layers- Properties/ Reduce the Opacity of this layer to 80%
49. Put the tube in the right place
50. Effects- 3D- Effects- Drop Shadow with these settings: 0, 0, 30, 0 Color black 6
51. Open "Miz_NewYear21_el 6 "
52. Edit-Copy
53. Activate your work
54. Edit - Paste as new layer
55. Image Resize 1 x 50% and 1 x 80%
56. Layers- Properties/ Reduce the Opacity of this layer to op 80 %
57. Put the tube in the right place
58. Effects- 3D- Effects- Drop Shadow with these settings: 0, 0, 30, 0 Color 6 black
59. Image - Add Borders-Symmetric checked: 2 Px Color 4
60. Image - Add Borders-Symmetric checked: 2 Px Color 1
61. Image - Add Borders-Symmetric checked: 2 Px Color 5
62. Selection-Select All.
63. Edit/Copy
64. Image - Add Borders-Symmetric checked: 50 Px Color 6
65. Selections/Invert
66. Layers- New Raster Layer
67. Edit-Paste into Selection
68. Adjust-Blur-Gaussian Blur-Radius 40.
69. Effects/ Plugins/ Filters in Unlimited 2.0/ VM Toolbox/ Seamless Tile
using the default settings: 16, 16, 16,255, 0
70. Selections-Select None
71. Layers- Duplicate
72.Layers- Merge- Merge Down
73. Activate the bottom of the layer palette
74. Select with your magic wand in the black border.
75. Effects/ Texture Effects / Blinds. Color 4

76. Selections/Invert
77. Activate the top of the layer palette
78. Effects- 3D- Effects- Drop Shadow with these settings: 0, 0, 100, 75 Color black 6
79. Selections-Select None
80. Add you watermark on new layer..
81. Image - Add Borders-Symmetric checked: 1 Px Color 6
82. Image Resize 900 pixels.-Resize all layers checked .
83. Save as JPG


©Webdesign Diane