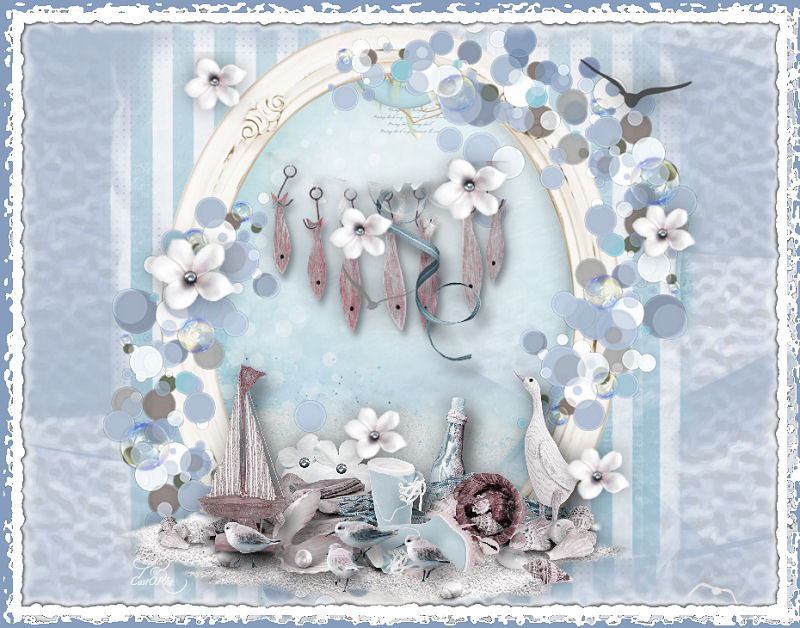
Psp Div3_Lesson 224
Marion translated this lesson into German, English and French.
Thank you kindly
Click on the flag for the translation
This lesson was written by myself
Any resemblance with an existing lesson is a coincidence
This tutorial was made with PSP 9 but can be done with other versions of Psp.
Respect their work, don't change anything about the tubes and don't say they are your tubes
The copyright belongs to the original artist.
Leave credit with the creator.
Alien Skin/xenofex2/ Burnt Edges... , Deformation/ Océan
Material
Take me with you, I'll show you where you left off.
![]()

Note: When working with your own colors - play with the Blend Mode and/or Opacity at your own discretion
Do you want other colors:
Adjust Hue and Saturation - Colorize with your choice of color
Material Properties:
1. Color- 1 (FG-Color #869dbd) Color 2 -( BG-Color #ffffff)
p>2. Open the Backgound image: AG_1
SHIFT + D we continue working on the copy
Close the original
3. Open the Background image: AG_2
4. Edit- Copy
5. Activate your work
6. Edit- Paste a new layer
7. Open the Tube : deco_3
8. Edit- Copy
9. Activate your work
10. Edit- Paste a new layer
11. Open the Tube: deco_4
12. Edit- Copy
13. Activate your work
14. Edit- Paste a new layer
15. Pick Tool: (K) on your keyboard -Enter these parameters on the Toolbar
Position X 172 - Position Y 14.

Effects- 3 D-Effects- Drop Shadow with these settings: 0, 0, 60, 40 Color black
16. Open the Tube; deco_5
17. Edit- Copy
18. Activate your work
19. Edit- Paste a new layer
20. Open the Tube : cluster
21. Edit- Copy
22. Activate your work
23. Edit- Paste a new layer
24. Pick Tool: (K) on your keyboard -Enter these parameters on the Toolbar
Position X 112 - Position Y 239.

Effects- 3 D-Effects- Drop Shadow with these settings:
0, 0, 60, 40 Color black25. Open the Tube: deco_6
26. Edit- Copy
27. Activate your work
28. Edit- Paste a new layer
29. Pick Tool: (K) on your keyboard -Enter these parameters on the Toolbar
Position X 178 - Position Y 45.

Effects- 3 D-Effects- Drop Shadow with these settings: 0, 0, 60, 40 Color black
30. Open the Tube: deco_7
31. Edit- Copy
32. Activate your work
33. Edit- Paste a new layer
34. Pick Tool: (K) on your keyboard -Enter these parameters on the Toolbar
Position X 384 - Position Y 54.

35. Place your name or watermark
36. Layers- Merge- Merge All
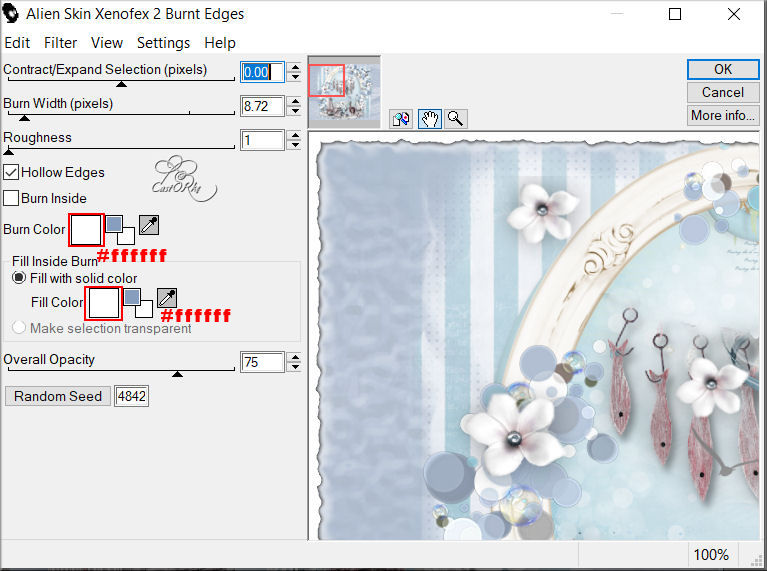
37. Effects-Plugins- Alien Skin Xenofex 2/ Burnt Edges…use the settings below

38. Afbeelding/ Randen Toevoegen 15 Px-Foregrond color blue
39. Activate your Magic Wand – Tolerance at 0 and Feather at 0
Click with the magic wand in the blue border.
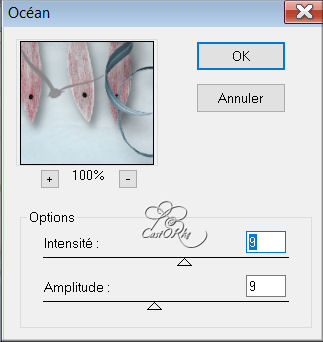
40. Effects- Plugins - Deformations/ Océan - with these settings : 9 - 9

41. Save as JPG
Send it to me in original size.
I'll post it with the other examples.
Please do include your name and the lesson number and title.
Send me a mail so I can see to the problem ? Email me
Copying this lesson, in whole or in part, without the author's permission is prohibited. ©Webdesign Diane
The lessons are registered with TWI


