Psp Div3_Lesson 221
French Translation by Sophie
Click on the banner below.
![]()

Thanks Sophie
Translated by Marion into English and German
Thanks Marion
~~~~~~~~~~
Click on the flag for the translation..
Filters:
AAA Frames/ texture Frames.
Material here
This lesson was written by myself![]()
![]()
![]()
Any resemblance with an existing lesson is a coincidence
This tutorial was made with Psp 9 but can be done with other versions of Psp
The colours may vary significantly depending on the Psp used. . .
Leave credit with the creator.

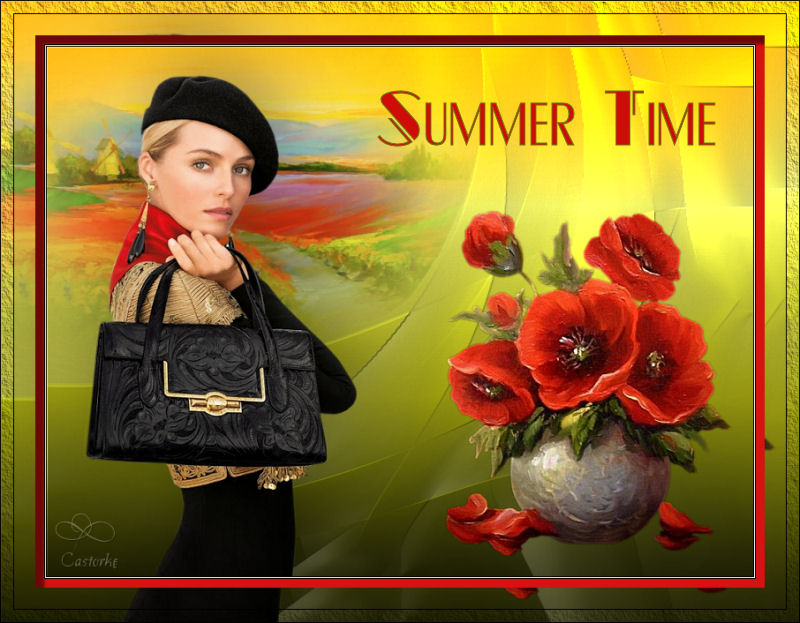
Let's start the lesson
Take me with you, I'll show you where you left off.
![]()

-Using other colors play with the blend mode to get the desired effect.
Do you want other colors: Adjust- Hue and Saturation- Colorize
Color palette:

1. Color 1 (FG-Color #f9cc2b) Color 2 ( BG-Color #76780b)
2. Open alpha channel_lesson 221
3. Shift+D Duplicate and close Original.
We work on the copy
4. Flood Fill Tool-Fill the layer with color 3
5. Open the Tube : deco1
6. Edit- Copy
7. Activate your work -
Edit- Paste as new layer
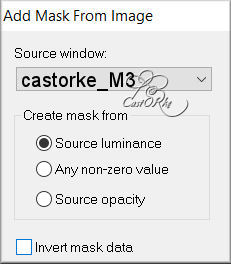
8. Open the mask: masker castorke_M3 into your psp and minimize
9. Activate your work
10. Layers- New Mask Layer-From Image and select Mask
11. Layers- Merge- Merge Group
12. Effects-3D-Effects- Drop Shadow with these settings: 1, 1, 100, 0 == Color 4 (black)
13. Layers-Properties-Set the Blend Mode to " Hard Light "
14. Layers- Duplicate
15. Layers- New Raster Layer
16. Selections-Load/Save Selection-Load Selection From Alpha Channel-Selection #1
17. Open the Tube: Imagen 12
18. Edit- Copy
19. Activate your work
20. Edit-Paste into Selection.
21. Selections-Deselect All
22. Open the Tube: FZ11rQ_DD5UdktkC74aJJMRVS6I
23. Edit- Copy
24. Activate your work
25. Edit-Paste as new layer
26. Image- Resize 85%
resize all layers not checked
27. Remove the name .
28. Image - Mirror - Mirror Horizontal (Image - Mirror in older versions of PSP)
29. Adjust-Sharpness-Sharpen
30. Pick Tool: (K) on your keyboard -Enter these parameters on the Toolbar
Position X -17 - Position Y -12
31. Effects-3D-Effects -Drop Shadow
with these settings; -15, 15, 30, 100 Color black
32. Open the Tube : Tineke's tubes - 801
33. Edit- Copy
34. Activate your work
35. Edit-Paste as new layer
36. Image- Resize 85%
37. Remove the name .
38. Adjust-Sharpness-Sharpen
39. Put the tube in the right place (see finished image)
40. Effects-3D-Effects -Drop Shadow
with these settings: -15, 15, 30, 100 Color black
41. Open the Tube: text_summerTime
42. Edit- Copy
43. Activate your work
44. Edit-Paste as new layer
45. Put the tube in the right place (see finished image)
46. Edit-Copy Special-Copy Merged
47. Image - Add Borders-Symmetric checked: 1 Px -Color 4
48. Image - Add Borders-Symmetric checked: 1 Px -Color 3
49. Image - Add Borders-Symmetric checked: 1 Px -Color 4
50. Image - Add Borders-Symmetric checked: 10 Px- Color 5
51. Selections-Select All
52. Image - Add Borders-Symmetric checked: 40 Px -Color 2
53. Selections-Invert
54. Edit-Paste into Selection.
55. Effects-Plugins- AAA Frames/ Texture Frames - Width 15 and OK
56. Selections-Invert
57. Layers- New Raster Layer
58. Effects-3D-Effects-Cutout with these settings:
10, 10, 50, 5
Shadow Color 4 ---- inner fill with DO NOT check.
59. Selections-Deselect All
60. Place your name or watermark
61. Layers- Merge-Merged All (flatten)
62. Image- Resize 900 Pixels.
63. Save as JPG
Send it to me in original size.
I place it with the other examples.
Please do include your name and the number of this lesson
Copying this lesson, in whole or in part,
without the author's permission is prohibited.
The lessons are registered with TWI
©Webdesign Diane