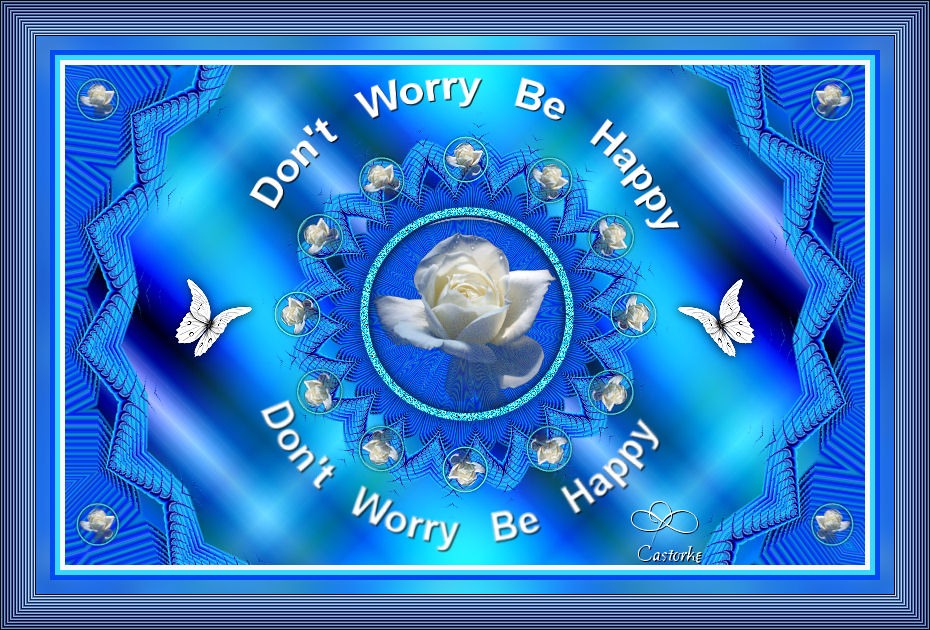
Psp Div3_LESSON 200
Translations by Marion into , French, English and German
Translated by Sylviane in Spanish
Translated into Portuguese by Estela
I am grateful for the help of the translators of this site.
Click on the flag for the translation.
This lesson was written by myself
Any resemblance with an ePxisting lesson is a coincidence
This tutorial was made with Psp 9 but can be done with other versions of Psp.
The colours may vary significantly depending on the Psp used. . .
Without them, this lesson would not be possible.
Respect their work, don't change anything about the tubes and don't say they are your tubes
The copyright belongs to the original artist.
Leave credit with the creator.
Take me with you. I'll show you where you left off.
![]()
Save your work regularly !
- Window / Duplicate
- Close the originals and work with the copies

1. Open the color palette

Material Properties:
Color 1 (FG-Color #f8f9fe) -Color 2 ( BG-Color #004bf1 ) -Color 3 ( Color #38d9ff) -Color 4 ( Color #000000 )
2. Open castorke_les 200_alpha channel
(SHIFT + D) we continue working on
the copy
Close the original
We continue to work on the duplicate
3. Selections- Select All
4. Open background image -Les200_AG
5. Edit-Copy
6. Activate your work
7. Edit-Paste into Selection .
Selections- Deselect All
8. Open the tube: Les200_deco1.
9. Edit-Copy
10. Activate your work
11. Edit-Paste as new layer.
12. Selections/Load/Save Selection/Load Selection from Alpha Channel - selection # 1
13. Layers- New Raster Layer
14. Flood Fill Tool-Fill the selection with color 3
15. Selections- Modify-Contract 8 PPx
16. Press Delete
17. Selections- Invert
18. Adjust-Add/Remove-Noise-Add Noise -100 Gaussian checked
19. Selections-Deselect All
20. Effects-3D-Effects-Drop Shadow with these settings: 0,0, 80, 40 Color black.
21. Open the tube: 12206401738_fleurs
22. Edit-Copy.
23. Edit-Paste as new layer.
24. Image/ Resize 2 Px 60%
Resize all layers unchecked.
25. Selections/Load/Save Selection/Load Selection from Alpha Channel - selection # 2
26. Effects-Plugins- Alien Skin/ Eye Candy5/ Impact/ Glass - Clear
27. Selections-Deselect All
28. Layers- Merge- Merge- Down
29. Layers- Duplicate
30. Image/ Resize 20%
31. Adjust-Sharpness-Sharpen
32. Pick Tool: (K) on your keyboard -Enter these parameters on the toolbar
Position Px 8 --- Position Y 15.
33. Edit-Copy.
34. Edit/Paste as a new image !!
Put this image aside, we will need it again in a moment
35. Activate your work
36. Layers- Duplicate
37. Image - Mirror - Mirror Horizontal (Image - Mirror in older versions of PSP)
38. Layers- Merge- Merge- Down
39. Layers- Duplicate
40. Pick Tool: (K) on your keyboard -Enter these parameters on the toolbar
Position Px 8 --Position Y 435
41. Open the minimized image from step 34. (little flower)
42. Edit-Copy.
43. Activate your work
44. Edit-Paste as new layer.
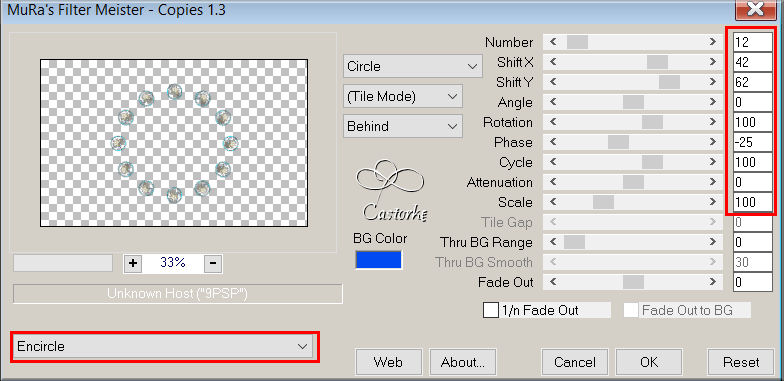
45. Effects-Plugins- Mura meister/ Copies with the following settings
Encircle 12- 42 -62 -0 -100 -25 -100- 0 -100
46. Open the tube: tekst Pxt_dontWorryBeHappy2
47. Edit-Copy.
48. Activate your work
49. Edit-Paste as new layer.
50. Effects-3D-Effects-Drop Shadow with these settings: 1,1, 100, 0 Color black
51. Open the tube: PD Be My Valentine Butterfly 222
52. Edit-Copy
53. Activate your work
54. Edit-Paste as new layer.
55. Effects- Edge Effects- Enhance More
56. Effects-3D-Effects-Drop Shadow with these settings: 0,0, 75, 15 Color black
56a. Pick Tool: (K) on your keyboard -Enter these parameters on the toolbar
Position Px 595-- Position Y 175
57. Layers- Duplicate
58. Image - Mirror - Mirror Horizontal (Image - Mirror in older versions of PSP)
59. Image - Add Borders-Symmetric checked: 5 Px -Color 1
60. Image - Add Borders-Symmetric checked: 5 Px -Color 3
61. Image - Add Borders-Symmetric checked: 5 Px -Color 2
62. Edit-Copy.
63. Selections- Select All
64. Image - Add Borders-Symmetric checked: 50 Px -Color 1
65. Selections- Invert
66. Edit-Paste into Selection
67. Adjust-Bur-Gaussian Blur-Radius 30 %
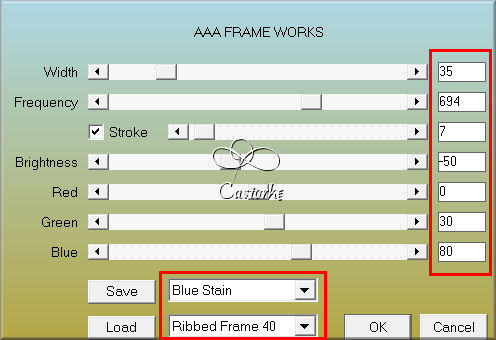
68. Effects-Plugins- AAA Frames/ Frame Works with the following settings
69. Selections- Invert
70. Effects-3D-Effects-Drop Shadow with these settings: 0, 0, 100,100 Color black
Selections-Deselect All
71. Add your watermark
72. Layers-Merge- Merge All (flatten)
73. Save as JPG
I hope you enjoyed this lesson
I am curious about your work.
Send it to me in original size.
I'll publish it with the examples.
Please include your name and lesson number.
Thank you for creating the lesson.
Copying this lesson, in whole or in part,
without the author's permission is prohibited.
The lessons are registered with TWI

©Webdesign Diane

