
Psp Div3_Lesson 193
French Translation by Sophie Click on the banner below.. Merci Sophie
![]()

Translated by Marion In English and German
Thanks Marion.
Click on the flag for the translation.
Let's start the lesson
Take me with you, I'll show you where you left off.
![]()
Open the tubes in a map of your choice or in the program PSP.

1. Open the color palette.
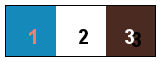
2. Color 1 (FG-Color #1589ba ) Color 2 ( BG-Color #ffffff (white)
Color 3 #4a2a21
3. Open Castorke Alpha Channel " castorke_les193_alfakanaal
4. Duplicate ( SHIFT + D )
5. Close the original.
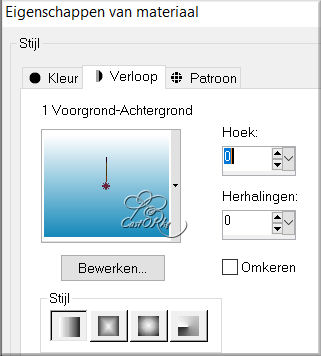
6. Material Properties: Set your Foreground color to color #1589ba =1
Set your Background color to color #ffffff =2
Replace your Foreground color with a Foreground/Background Linear Gradient configured like this
Angle 0, Repeats 0
7. Flood Fill Tool – Fill the layer with the Gradient .
8. Layers-Duplicate
9. Image-Resize 80%
Resize all layers not checked.
10. Image - Mirror - Mirror vertical ( Image - Flip in older versions of PSP)
11. Effects-3D-Effects-Drop Shadow with these settings: 0, 0, 60, 20 color black
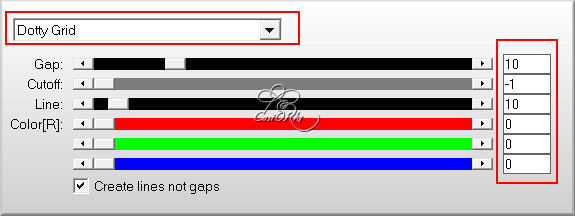
12. Effecs-Plugins- Ap [lines]- Silverlining use the settings below
13. Layers- Merge- Merge Down
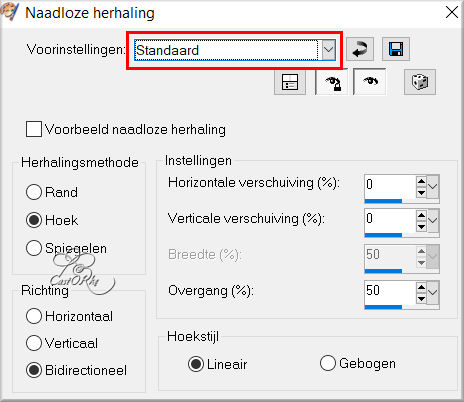
14. Effects- Image Effects- Seamless Tiling use the settings below
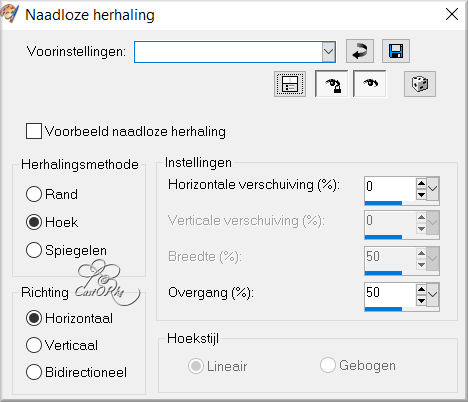
15. Repeats: Effects- Image Effects- Seamless Tiling use the settings below
16. Layers- New Raster Layer
17. Flood Fill Tool-Fill the layer with the Background color #ffffff=2
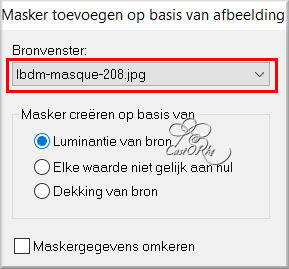
18. Open your mask lbdm-masque-208 in your psp and minimize.
19. Layers- New Mask Layer-From Image and select mask.
20. Layers- Merge- Merge Group
21. Effects-Edge Effects- Enhance
22. Effects-3D-Effects-Drop Shadow with these settings: 0, 0, 60, 20 Color Black
23. Layers -Duplicate
24. Image - Mirror - Mirror Horizontal (Image -
Mirror in older versions of PSP)
Layers-Properties-Set the Blend Mode to " Multiply"
(this differs from your colors try them one at a time or skip this step.)
26. Layers- Merge- Merge Visible
27. Selections/Load/Save Selection/Load Selection from Alpha Channel - Selection 1
28. Layers- New Raster Layer
29. Flood Fill Tool-Fill the selection with the Gradient
30. Effects-3D-Effects-Drop Shadow with these settings: 0, 0, 60, 20- Color Black
31. Layers- New Raster Layer
32. Flood Fill Tool-Fill the selection with the Gradient
33. Selections-Modify-Contract with 5 Px
34. Press Delete
35. Layers- New Raster Layer
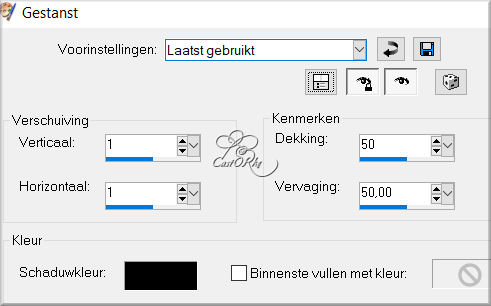
36. Effects-3D-Effects-Cutout use the settings below
37. Selections- Deselect All.
38. Open the Tube : 0_cda1f_b307a388_X5L
39. Edit-Copy
40. Activate your work
41.Edit-Paste as new layer
42. Image-Resize 1 x 80% -1 x 85%
43. Pick Tool: (K) on your keyboard -Enter these parameters on the Toolbar
Position X 264, Position Y 83
44. Layers- Arrange- Move Down
45. Image - Add Borders-Symmetric checked: 1 Px -Color 1
46. Image - Add Borders-Symmetric checked: 5 Px -Color 2
47. Image - Add Borders-Symmetric checked: 5 Px -Color 1
48. Image - Add Borders-Symmetric checked: 30 Px -Color 2
49. Open the Tube: calguisfashion28022014
50. Edit-Copy
51. Activate your work
52. Edit-Paste as new layer
53. Image-Resize 3 X 80%
54. Edit-Repeat- Image-Resize
55. Edit-Repeat- Image-Resize
56. Image - Mirror - Mirror Horizontal (Image - Mirror in older versions of
PSP)
57. Adjust-Sharpness-Sharpen
58. Effects-3D-Effects-Drop Shadow with these settings: 0, 0, 60, 20 Color bBack
59. Move the Tube to the left side (see finished image)
60. Open the Tube: Birds17112014es
61. Activate selection tool-rectangle-make a selection around the name..
62. Selections-Invert.
63. Edit-Copy
64. Activate your work
65. Edit-Paste as new layer
66. Image-Resize 80%
67. Move to the right (see finished image)
68. Adjust-Sharpness-Sharpen .
69. Effects-3D-Effects-Drop Shadow with these settings: 0, 0, 60, 20 Color Black
70. Image - Add Borders-Symmetric checked: 2 Px -Color 3
71. Image - Add Borders-Symmetric checked: 25 Px -Color 2
72. Effects-Plugins-AAA Frames/ Foto Frame use the settings below
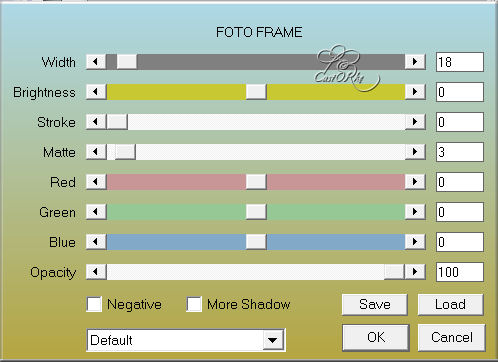
73. Edit-Repeat- Foto Frame with the same settings.
74. Add you watermark on new layer.
75. Layers-Merge- Merge All (flatten)
76. Save as JPG
I'll post it with the other works .
Thank you for creating the lesson


Copying this lesson, in whole or in part,
without the author's permission is prohibited.
The lessons are registered with TWI.

©Webdesign Diane