Psp Div3_lesson 177
Translated by Marion into French, English, German
Thank you Marion
Click on the flag for translation.Any resemblance with an existing lesson is a coincidence
This tutorial was made with PSP 9 but can be done with other versions of Psp.
Without them, this lesson would not be possible.
The copyright belongs to the original artist. Leave credit with the creator.

Without them, this lesson would not be possible.
Let's start the lesson
Take me with you, I'll show you where you left off.
1. Place the brushes in the brushes folder of your psp 2. -Material Properties: Set your Foreground color to color - Set your Background color to color 3. Open Alpha Channel" 4. Duplicate the IMAGE ( SHIFT + D )
5. Close the original. 7. Select- Select All
8. Open your Background image -Promote Background Layer=Raster 1 9.
Edit-Copy 10. Activate your work
11. Edit - Paste into Selection
12. Selection-Deselect All.
13. Open the tube "kader1 " 14. Edit- Copy 15. In the layer palette-activate the bottom layer =Raster 1 16.
Selections/Load/Save Selection/Load Selection from Alpha Channel / Selection 1
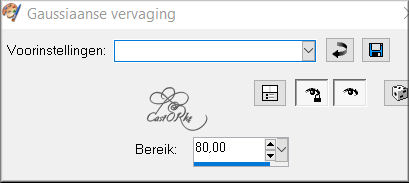
17. Selections-Promote Selection to Layer
18. Adjust- Blur-Gaussian Blur-Radius 80 % 19. Leave the selection !
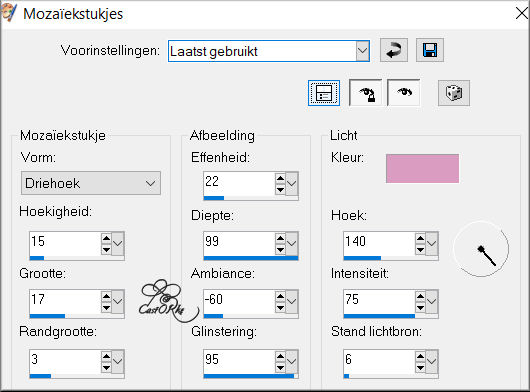
20. Effects-Texture Effects-Soft Plastic with these settings: 0,37,75 45
Color White 21. Adjust-Sharpness-Sharpen.
22. Selection-Deselect All.
23. Layers- New Raster Layer
24. Brush Tool-Activate the brush- 26. Leave the selection!
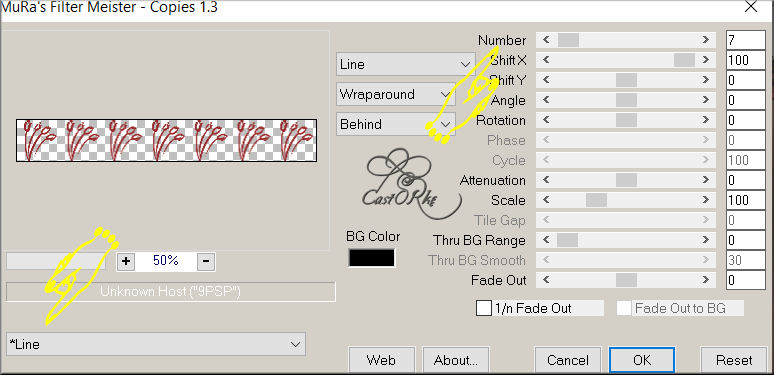
27. Effects-Plugins-MuRa s' Meister/ Copies….
Number 7 ------Select Line use the settings below 28. Selection-Deselect All.
29. Effects- 3D-Effects-Drop Shadow with these settings: 0, 0, 100, 48 -Color
yellow #ffff00
30. Adjus-Add/Remove Noise/Add Noise -Noise 50 Uniform checked 31.
Selections/Load/Save Selection/Load Selection from Alpha Channel / Selection
2
32. Layers- New Raster Layer
33. Flood Fill Tool -Opacity 60 %- Fill the selection with the Background
color Black 34. Layers- New Raster Layer
35. Open the tube : copie_bewerkt_Arc_de_Triomphe_la_nuit_CibiBijoux
36. Edit-Copy 37. Activate your work
38. Edit - Paste into Selection
39. Layers- Duplicate
40. Selection-Deselect All.
41. Adjust-Sharpness-Sharpen.
42. Selections/Load/Save Selection/Load Selection from Alpha Channel / Selection 3
43. Activate Raster 1 in the layer palette 44. Selections-Promote
Selection to Layer
45. Effects-Texture Effects-Blinds with these settings: 3, 60
46. Selections-Deselect All
47. Activate Raster 1 in the layer palette.
48. Selections/Load/Save Selection/Load Selection from Alpha Channel / Selection 4
49. Selections-Promote Selection to Layer
50. Effects-Texture Effects-Tiles -Triangles use the settings below--Color #da9cc1
51. Selection-Deselect All.
52. Layers-Properties-Set the Blend Mode to " Overlay "
53. Open the Tube : tour eiffel pleine
54.Edit-Copy 55. Activate your work
56. -Edit - Paste as new layer
57. Move to the right (see finished image).
58. Layers-Properties-Set the Blend Mode to " Multiply " .
59. Open the tube: castorke_deco1_les177
60. Edit-Copy
61. Activate your work
62. -Edit - Paste as new layer
63. Image/ Resize 75%
Resize all layers- Not Checked
64. Adjust-Sharpnes-Sharpen More.
65. Move the tube in the right place ( see finished image) 66. Activate the
top of the layer palette 67. Open the tube: capeline_SnakeParisSign
68. Edit-Copy
69. Activate your work
70. -Edit - Paste as new layer
71. Effects-3 D-Effects-Drop Shadow with these settings: 5, 5, 100, 5 Color
Black
72. Repeat: Effects- 3D-Effects-Drop Shadow with these settings: -5,
-5,100, 5 Color Black
73. Move the tube in the right place ( see finished image) 74.
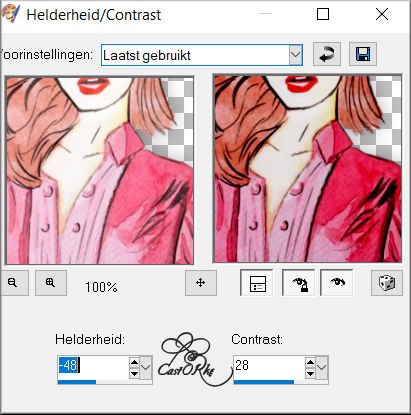
Adjust-Brightness and Contrast-Brightness /Contrast-with these settings: -48, 28
75. Open the tube: capeline
76. Activate the Selection Tool -Custom Selection -make a selection around
the name 77. Selections-Invert 78. Edit-Copy !! Selections-Deselect All
79. Activate your work
80. -Edit - Paste as new layer
81. Image-Resize 85%
82. Resize all layers- Not Checked
83. Adjust-Brightness and Contrast-Brightness /Contrast-with these settings: -48, 28
84. Move the tube in the right place 85. Effects-3D-Effects-Drop Shadow
with these settings: 3, 3, 100, 0 Color Black
86. Layers- New Raster Layer
87. Selections/Load/Save Selection/Load Selection from Alpha Channel / Selection 5
88. Selections-Invert
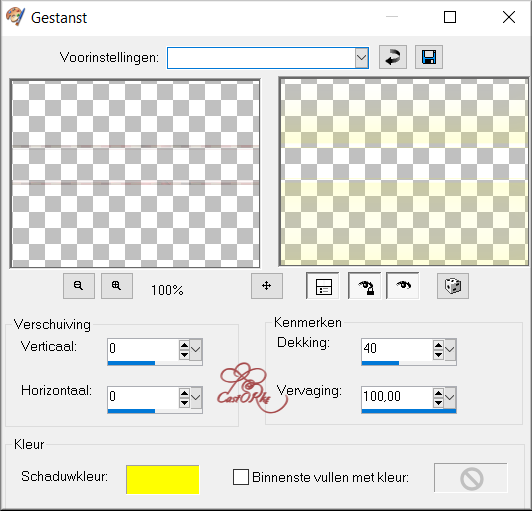
89. Effects-3D-Effects-Cutout with these settings 0, 0, 15, 100
Color Yellow #fff000
90. Layers-Arrange-Move Down 3 x
Comes under the layer of the frame.
91. Selections-Deselect All
92. Image - Add Borders-Symmetric checked: 5 Px -Color Black
93. Image - Add Borders-Symmetric checked: 5 -Px rood
94. Image - Add Borders-Symmetric checked: 30 Px -Color Black
95. Image- Resize 800 Pixels Width-Resize all layers checked
96. Add you watermark on new layer..
97. Save as JPG
Please do include your name and the lesson number and title.. ©Webdesign Diane![]()
Open materials in Psp, duplicate (shift D) and close the original, work with
duplicates
#972829
#000000
lesson177_alfakanaal
6.On this, we will continue to work.
Activate your work.
Edit - Paste as new layer

-lyndiebrush469 002
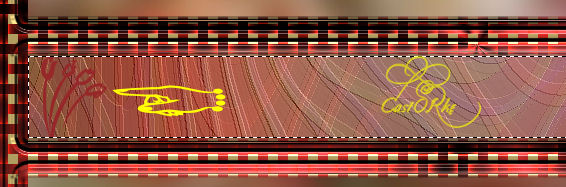
25.Stamp the brush at the front of the selection- as shown in the example
below
Please send it to me in original size.
Questions related to the lesson ? Or submit the lesson? Mail me

The lessons are registered with TWI.