Take me with you, I'll show you where you left off.

Open the tubes in a map of your choice or in the program PSP.
Save your work regularly !
ATTENTION: Duplicate your tubes and work with the copies
Place the gradient in the folder gradients of your psp
Let's start the lesson
Material Properties:
Set your Foreground color to color
#c2c097
Set your Background color to color #c1acaa
1. Open alpha channel_lessons 27.
2. Shift+D Duplicate and close Original
We work on the copy
3.
Selections-Select All
4. Open the Image; AG_pas_les27
5. Edit-Copy
6. Activate your work
7. Edit-Paste -Into Selection
8. Effects- Edge Effects-Enhance
9. Selections/Load/Save Selection/Load Selection from Alpha Channel-
Selection # 1.
10. Selections- Promote Selection to Layer
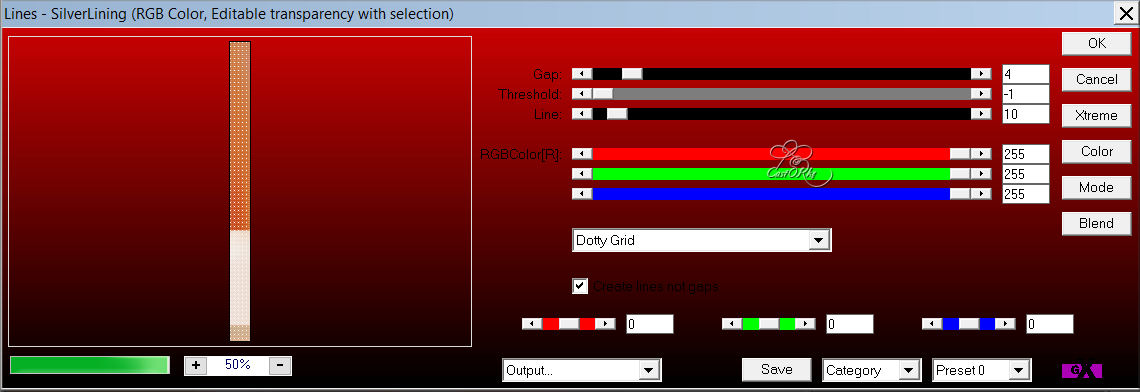
11. Effects-Plugins-AP [Inovations] - Lines Silverlining.
==Dotty Grid== 4, -1, 10 255,255,255
12. Selections-Deselect All
13. Layers- Duplicate
14. Image - Mirror - Mirror Horizontal (Image - Mirror in older versions of
PSP)
15. Layers-Merge- Merge Down
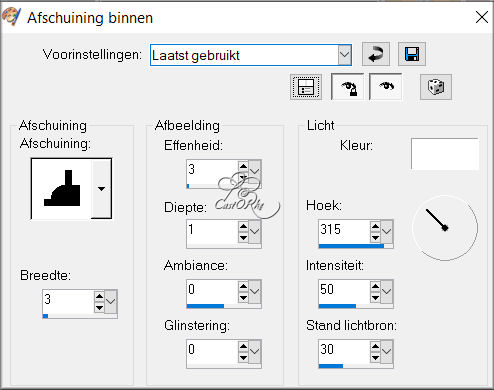
16. Effects- 3D-Effects-Inner Bevel with these settings -No 6 color white
17. Activate Raster 1 in the layer palette
18. Open the Image: AG2_pasen_les27
19. Edit-Copy
20. Activate your work
21. Edit - Paste as new layer
22. Selections/Load/Save Selection/Load Selection from Alpha Channel-
Selection # 2.
23. Selections- Promote Selection to Layer
24. Effects-Plugins-Filter in Unlimited 2/ It@lian Editors Effect/ Effetto Fantasma
using the default settings
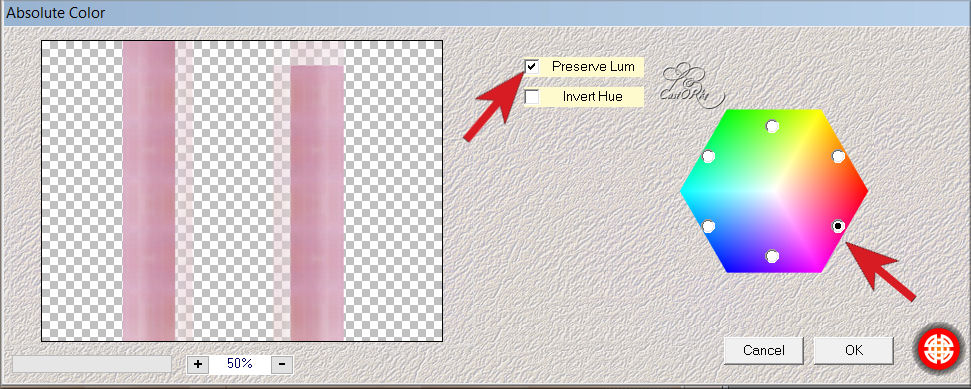
25. Effects-Plugins -Mehdi -Absolute Color.using
the default settings
26. Effects- 3D-Effects-Drop Shadow with these settings: 3, 3, 60, 0 color #9c283d
27. Repeat: Effects- 3D-Effects-Drop Shadow with these settings:( -3), ( -3), 60, 0 color #9c283d
28. Selections-Deselect All
29. Layers-Properties-Set the Blend Mode to " Multiply"
30. Open the Tube : Easter8qw_Silvie_27.02.2021
31. Edit-Copy
32. Activate your work
33. Edit - Paste as new layer
34. Image-Resize 80 %
Resize all layers not checked
35. Repeat : Image-Resize 90%
36. Pick Tool: (K) on your keyboard -Enter these parameters on the Toolbar
Position
X 11----- Position
Y 308
37. Effects- 3D-Effects-Drop Shadow with these settings: ( -3), ( -3), 30, 20 color
black
38. Open the tube: 1932016esPasen4
39. Edit-Copy
40. Activate your work
41. Edit - Paste as new layer
42. Image-Resize 55 %
43. Remove the name.
44. Pick Tool: (K) on your keyboard -Enter these parameters on the Toolbar
Position X 322 --- Position Y 272
45. Effects- 3D-Effects-Drop Shadow with the same settings
46. Open the
Tube: Wieskes tube 1227
47. Edit-Copy
48. Activate your work
49. Edit - Paste as new layer
50. Remove the name.
51. Pick Tool: (K) on your keyboard -Enter these parameters on the Toolbar
Position X 504 ----- Position Y 21
52. Effects- 3D-Effects-Drop Shadow with these settings: ( -3), ( -3), 30, 20
color black
53. Layers- Duplicate
54. Pick Tool: (K) on your keyboard -Enter these parameters on the Toolbar
Positie X 537 ----
Position Y 4
55. Layers-Properties--Reduce the opacity of this layer to 50%
56. Layers- Arrange- Move Down
57. Open the Tube : paasei_les27
58. Edit-Copy
59. Activate your work
60. Edit - Paste as new layer
61. Pick Tool: (K) on your keyboard -Enter these parameters on the
Toolbar
Position X 564 ---- Position Y 437
62. Open the Tube: Riet_Tekst Easter_587_310320
63. Edit-Copy
64. Activate your work
65. Edit - Paste as new layer
66. Remove the name.
67. Image-Resize 80 %
68. Effects- 3D-Effects-Drop Shadow with these settings: 1, 1, 100, 0 color
black
69. Pick Tool: (K) on your keyboard -Enter these parameters on the
Toolbar
Position X 135 ---- Position Y 35
70. Layers-Properties-Set the Blend Mode to " Overlay "
71. Layers- Duplicate
72. Layers-Properties-Set the Blend Mode to " Screen "
73. Material Properties: Set your Foreground color to color #c2c097
Set your Background color to color #c1acaa
74. Image - Add Borders-Symmetric checked: 5 Px -Color #c2c097
75. Select the border with your magic wand
76. Material Properties: Set
your Background color to color #c84d1d
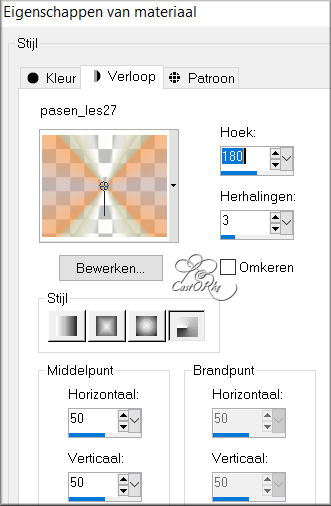
Activate the Easter_lesson 27 gradient
Change the foreground to a radial
gradient-Angle180, Repeat 3
77. Flood Fill Tool – Fill the selection with the gradient
78. Selections-Deselect All
79. Edit-Copy
80. Open the Frame : Kader_les 27
81. Click with your magic wand in the center of your frame
82. Edit-Paste -Into
Selection
83. Selections-Deselect All
84. Place your name or watermark
85. Save as JPG
I hope you enjoyed this lesson
I look forward to seeing your work.
Send it to me in original size.
To see your achievements. H