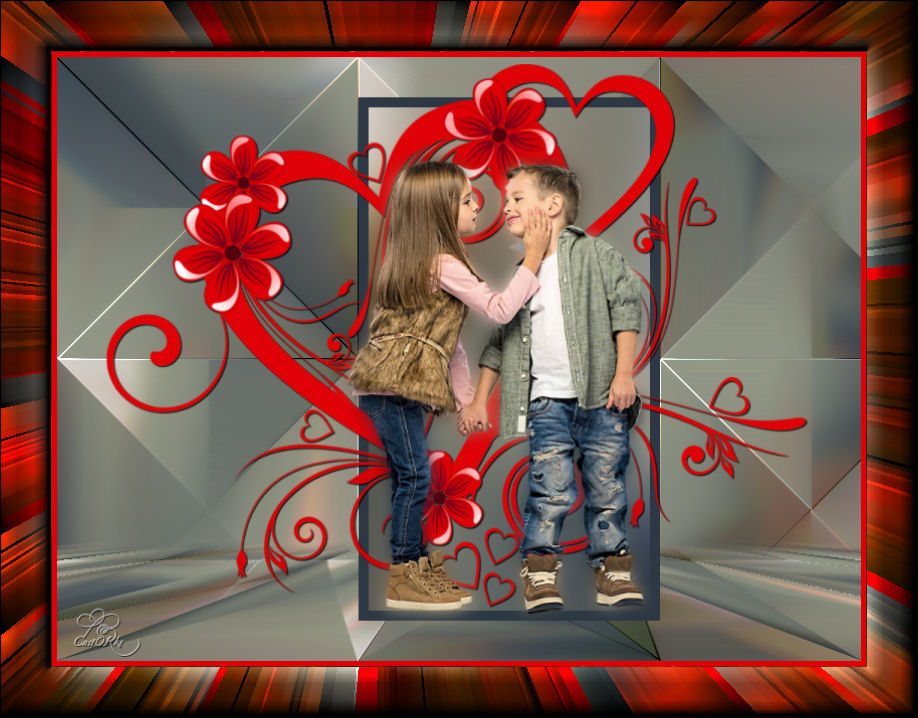
Psp Div3_les 210
VM Natural/Splash!
MuRa'S Meister / Perspective Tiling

Take me, I'll show you where you left off.
![]()

1. Color 1 (FG color # 2d3844) color 2 (BG color # e00007) color 3 (# 000000)

2. Open lesson210_AG .
3. Duplicate the image (SHIFT + D)
Close the original.
4. We will continue to work on this.
5. Double click in the layer palette on background layer and rename it raster 1
6. Duplicate layer.
7. Effects / Plugins / MuRa'S Meister / Perspective Tiling.
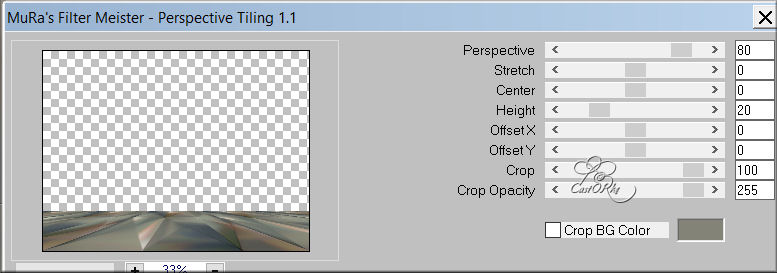
8. Activate the magic wand feather on 20 , tap in the middle of your work.
9. Press delete 3 times.
10. Set feather back to o (zero).
11. Selections / Select none.
12. Activate raster 1
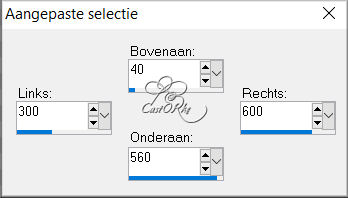
13. Activate selection. Press "S"
Custom Selection: Left 300, Right 600, Top 40, Bottom 560
14. Selections / Promote Selection to Layer.
15. Layers / Arrange / Bring to Front.
16. Adjust / Blur / Gaussian Blur 30
17. Layers / New raster layer.
18. Fill with color 1 FG color # 2d3844
19. Selections / Modify / Contract 10
20. Press delete.
21. Selections / Select none.
22. Open 28803-8-love-photos [1]
23. Edit / Copy.
24. Go to work.
25. Edit / Paste as a new layer.
26. Image / Resize 80 % percent.
Resize all layers DO NOT check.
27. Edit / Repeat format change .
28. Move up a bit.
29. Effects / 3D Effects / Drop Shadow. 1, 1, 100, 0 black.
30. Open castorke_tube_kinderen_120_090221
31. Make a selection r o nd banner.
32. Selections / Invert.
33. Edit / Copy.
34. Go to work.
35. Edit / paste as a new layer.
36. Image / Resize 80% percent.
37. Image / Resize 75% percent.
38. Put in place.
39. Duplicate the layer.
40. Activate the layer just below.
41. Adjust / Blur / Gaussian Blur 8
42. Place your name or watermark.
43. Image / Add Borders 5 px color 2 ( BG color # e00007 )
44. Edit / Copy.
45. Open frame_hearts .
46. Duplicate (SHIFT + D) closes the original.
47. Tap with magic wand in the transparent part.
48. Edit / Paste into selection.
49. Selections / Invert.
50. Effects / VM Natural / Splash! Standard settings.
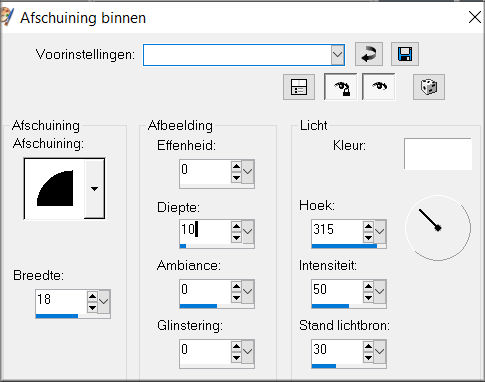
51. Effects / 3D Effects / Inner Bevel. NO 2
52. Selections / Select none.
53. Place your name or watermark.
54. Image / Add Borders 1 px Color 3 ( # 000000 )
55. Image / Resize 800 pixels.
Resize all layers check .
56. Save as .jpg


©Webdesign Diane