Psp Div3_lesson 209
This lesson was written by myself.
Any comparison with another is purely coincidental.
This lesson is written with PSP 9 but can be done in a different version.
Thanks to the tubeuses.
Without them it is not possible to make the lessons.
So please keep the tubes intact and don't clean them like your own.
They remain the property of the original artist.
Material:
Tube from: Ellys, MR and shared in groups.
Graphics Plus/ cross Shadow ,
Unlimited 2.0/ Button Frames ,
Mehdi/ Sorting Files.

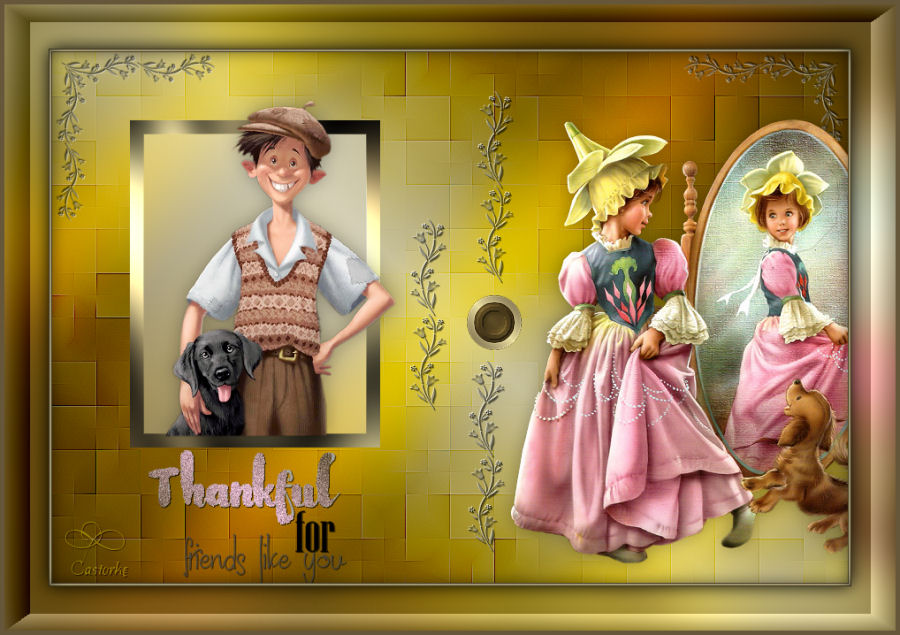
Take me, I'll show you where you left off.
![]()

1. Open the _color palette_les209.

2. FG color #fffedd == Color 4 ===BG color # b76ab8 == color 3
3. Open les209_alfakanaal.
4. Duplicate the image (SHIFT + D)
Close the original.
5. Selections / Select all.
6. Open les209_ag
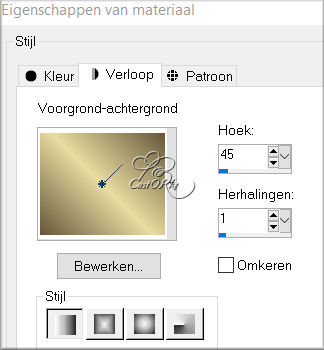
7. Edit / Copy
8. Go to work.
9. Paste Paste into selection.
10. Selections / Select none.
11. Duplicate layer.
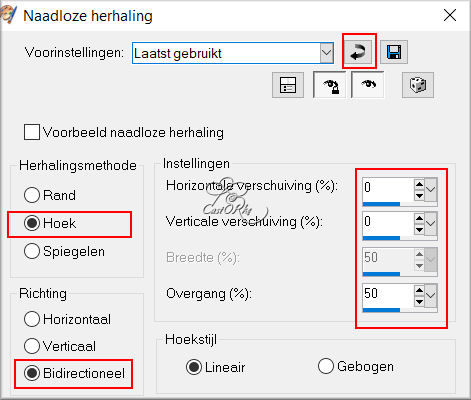
12. Effects / Image Effects / Seamless Tiling. - Default setting
13. Blend Mode - Burn Through.
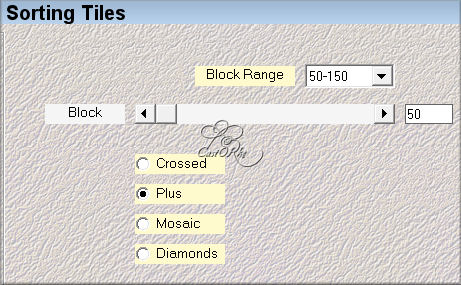
14. Effects / Plugins / Mehdi Sorting Tiles
15. Effects / Edge Effects / Enhance More.
16. Selections / Selection Load from Alpha channel. Selection 1
17. Activate raster 1 (bottom layer)
18. Selections / Promote Selection to Layer.
19. Layers / Arrange to Front.
20. New raster layer.
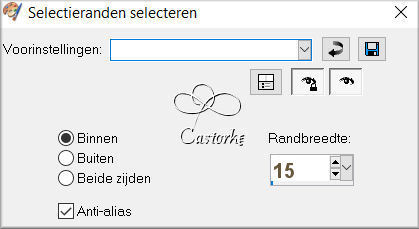
21. Selections / Modify / Select selection borders.
22. Fill with gradient FG color 4 ===BG color 3 - Linear, angle 45, repeat 1
23. Effects / Plugins/ Graphics Plus / Cross Shadow - default settings.
24. Selections / Select none.
25. Effects / 3-D effects. Drop shadow 0, 0, 30, 30 - color black.
26. Open 4
27. Make a selection around the name.
28. Selections / Invert.
29. Edit / Copy.
30. Go to work.
31. Edit / Paste as a new layer.
32. Image / Resize 43% percent.
Resize all layers DO NOT check.
33. Move in the frame to edge bottom. See example.
34. Adjust / Sharpness / Sharpen.
35. Effects / 3-D effects. Drop shadow 0, 0, 30, 30 - color black.
36. Open MR_Martine déguisement2
37. Edit / Copy.
38. Go to work.
39. Edit / Paste as a new layer.
40. Image / Resize 65% percent.
41. Move to the right against the side.
42. TAKE CARE! a selection (lasso) around the name and delete.
43. Adjust / Sharpness / Sharpen.
44. Effects / 3-D effects. Drop shadow 0, 0, 30, 30 - color black.
45. Open deco.
46. Edit / Copy.
47. Go to work.
48. Edit / Paste as a new layer.
49. Place in the top left corner.
50. Duplicate the layer.
51. Image / Mirror.
52. Layers / Arrange / move down 2 times.
53. Open deco2.
54. Edit / Copy.
55. Go to work.
56. Edit / Paste as a new layer.
Immediately looks good.
57. Open lesson209_deco3
58. Edit / Copy.
59. Go to work.
60. Edit / Paste as a new layer.
61. Effects / 3-D effects. Drop shadow 0, 0, 30, 30 - color black.
62. Put in place.
63. Open drN9fym
64. Edit / Copy.
65. Go to work.
66. Edit / Paste as a new layer.
67. Image / Resize 75% percent.
68. Move under the frame.
69. Activate The Magic Wand === Mode on add tolerance and feather 0.

Tap with magic wand in each gray letter. (Thankful)
71. Fill with gradient.
Still good, change only the BG color 5
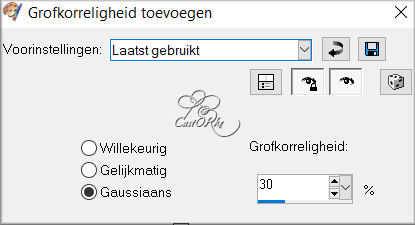
72. Adjust / Add noise. Gaussian 30
73. Effects / 3-D effects. Drop shadow 1, 1, 75, 0 - color black.
74. Image / Add borders 1 px color 4
75. Image / Add borders 2 px color 3
76. Image / Add borders 1 px color 4
77. Edit / copy.
78. Select all.
79. Image / Add borders 50 px color 4
80. Selections / invert.
81. Paste into selection.
82. Adjust / Blur / Gaussian Blur 25
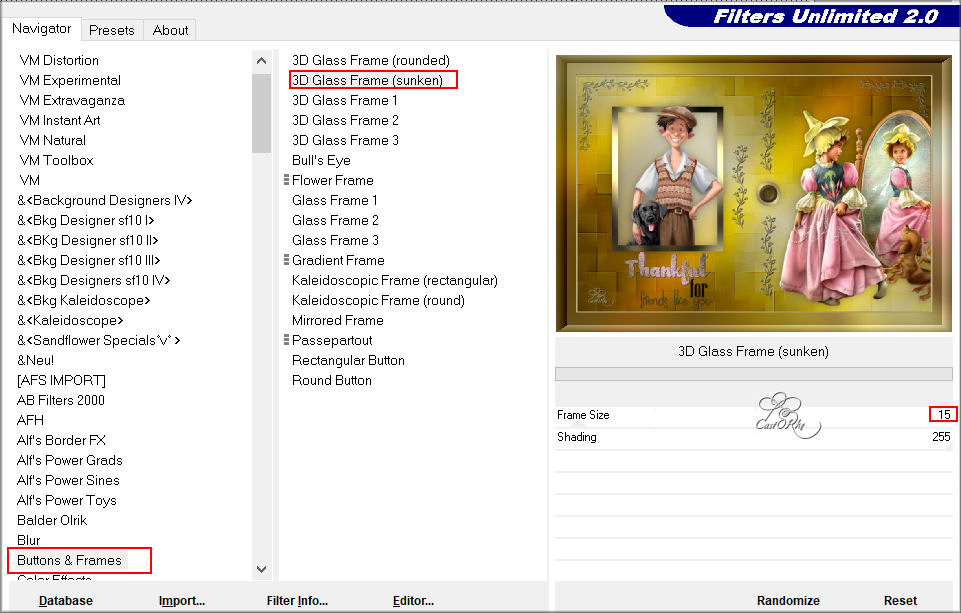
83. Effects / Plugins / Unlimites2.0 / Buttons & Frames / 3D Glass Frame (Shunken) Frame size 15
84. Effects / 3-D effects/ Drop shadow 0, 0, 75, 30 - color black.
85. Selections / invert.
86. Effects / 3-D effects/ Drop shadow 0, 0, 100, 30 - color black.
87. Place your name or watermark.
88. Image / Add borders 5 px color 4
89. Image / Resize 900px.
90. Resize all layers CHECK!
91. Save as .jpg
I am curious about your work.
Send it to me in full size.
I place it with the examples.
Please include your name and lesson number .
You can find your work HERE
Good luck !
Thanks for making the lesson.
Questions about the lesson? Send me an e-mail
Greetings Castorke


It is forbidden to copy this lesson, in whole or in part, without the permission of the author.
The lessons are registered with tutorial writers.

©Webdesign Diane