Psp Div3_lesson 206

Take me with you, I'll show you where you left off.
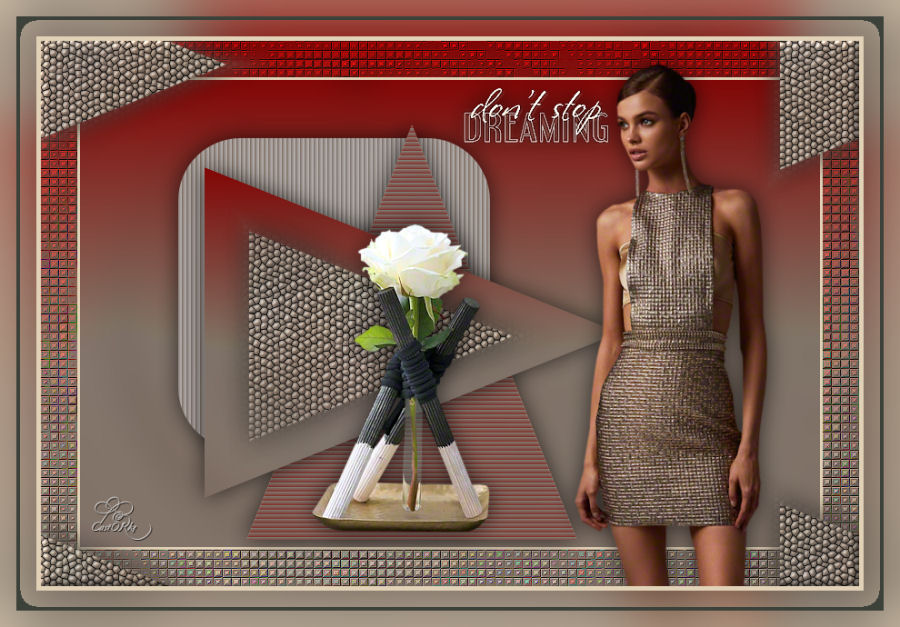
![]()
If you use other colors, change the blend mode.
Put the brush in your folder brushes.

1. Open the color palette.

2. Color 1 (FG color # fe0606) color 2 (BG color # e1d1b7)
3. Open ag_les206_alpha
Shift + D (to duplicate)
We will continue to work on this.
4. New raster layer.
5. Fill with gradient. Colors Foreground color 1 and Background color 2.
Linear 0, 0, Invert check
 .
.
6. Set blend mode to darken.
7. Activate the bottom layer (raster1)
8. Selections / Selection Load from Alpha channel - selection 4
9. Selections / Promote Selection to Layer.
10. Layers / Arrange / Bring to the front.
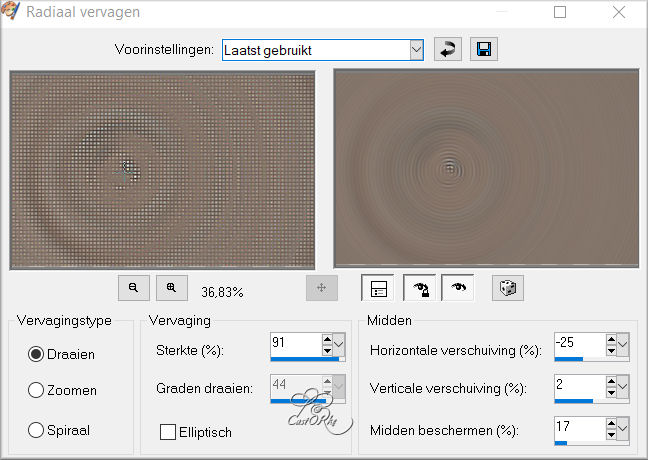
11. Adjust / Blur / Radial Blur
Turning, 91, 44 ______ (- 25), 2, 17
12. Effects / Edge Effects / Enhance More.
13. Edit / Repeat Enhance edges.
14. Adjust / Blur / Gaussian Blur 30
15. New raster layer.
16. Fill with gradient. (still in good condition)
Colors Foreground color 1 and Background color 2.
17 Set blend mode to darken.
18. Selections / Select none.
19. Activate the made selection.
20. Selections / Selection Load from Alpha channel - selection 1
21. Selections / Promote Selection to Layer.
22. Layers / Arrange / Bring to the front.
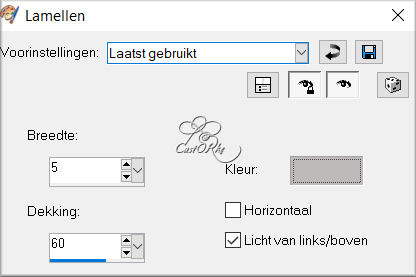
23. Effects / texture effects / Blinds
color 7 (# 821c1a)
24. Adjust / Sharpness / Sharpen.
25. Effects / 3D Effects / Drop Shadow 0, 0, 60, 30 color 4 black.
26. Selections / Select none.
27. Activate the reduced selection. middle layer
28. Selections / Selection Load from Alpha channel - selection 5
29. Selections / Promote Selection to Layer.
30. Layers / Arrange / Bring to the front.
31. New raster layer.
32. Fill with gradient.
33. Blend mode - darken.
34. Selections / Select none.
35. Activate the layer just below.
36. Effects / 3D Effects / Drop Shadow 0, 0, 60, 30 color 4 black.
37. Selections / Selection Load from Alpha channel - selection 3
38. Selections / Promote Selection to Layer.
39. Layers / Arrange / Bring to the front.
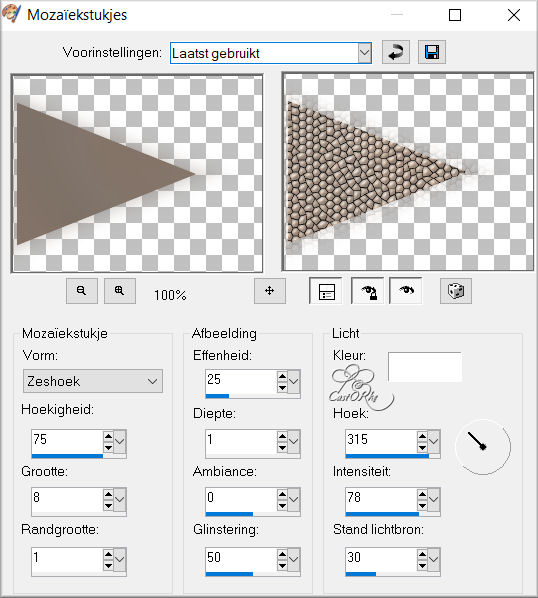
40. Effects / Texture Effects / Mosaic Pieces.
41. Selections / Select none.
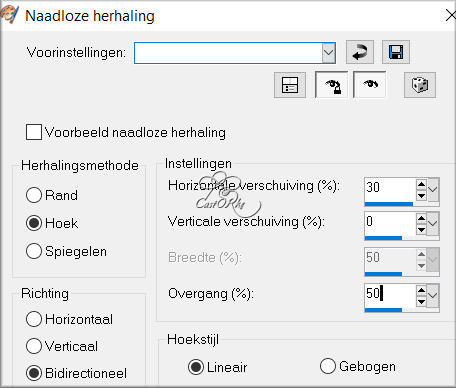
42. Effects / Image Effects / Seamless Tiling.
43. Duplicate the layer.
44. Blend Mode - Multiply.
45. Layer opacity 50
46. Layers / Merge / Merge Down.
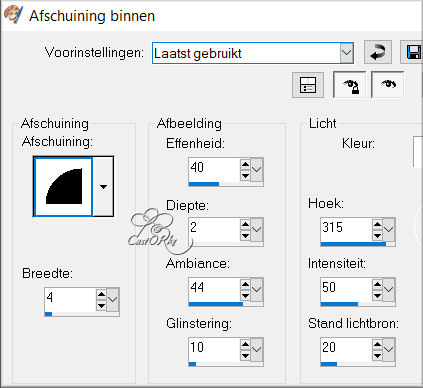
47. Effects / 3D Effects / Bevel / Inner. Colour White
48. Effects / 3D effects / Drop shadow 0, 0, 60, 30 color 4 black.
49. Activate the layered / reduced selection.
50. Selections / Load from Alpha channel ---- selection 2
51. Promote selection to layer.
52. Layers / Arrange / Move up.
53. Effects / texture effects / Blinds --- color3 #bebaba
54. Selections / Select none.
55. Effects / 3D effects / Drop shadow 0, 0, 60, 30 color 4 black.
56. Selections / Load from Alpha channel ---- selection 4
57 New raster layer
58. Fill with Color 2.
59. Selections / Modify / Contract 3.
60. Edit / Delete.
61. Selections / Select none.
62. Activate the top layer.
63. New raster layer.
64. Activate Brush - search agiBrush152_dreams.
size 170 light color stamp2 (AG color)
65. Effects / Edge Effects / Enhance.
66. Effects / 3D effects / Drop shadow 0, 0, 60, 30 color 4 black.
67. Duplicate the layer.
68. Layers / Merge / Merge Down.
69. Open SvB (1133) Beauty
70. Edit / copy.
71. Go to work.
72. Edit / Paste as a new layer.
73. Image / Resize 90%
74. Remove the watermark.
75. Put in place.
76. Effects / 3D effects / Drop shadow 0, 0, 60, 30 color 4 black.
77. Open SvB White rose
78. Edit / copy.
79. Go to work.
80 Edit / Paste as a new layer
81. Remove the watermark.
82. Effects / 3D Effects / Drop Shadow 0, 0, 60, 30 color 4 black.
83. Image / Add borders 5 px color 2
84. Selections / Select all.
85. Edit / Copy.
86. Image / Add borders 40 px color 5
87. Selections / Invert.
88. Edit / Paste into selection.
89. Adjust / Blur / Gaussian Blur 30
90. Selections / Modify / contract 18.
91. Fill with color 6.
92. Selections / Select none.
93. Place your name or watermark.
94. Layers / Merge / Merge all.
95. Image / Resize 900px.
96. Save as .jpg


©Webdesign Diane