Psp Div3_lesson 195

|
French Translation by Sophie Click on the banner below.
![]()

Thanks Sophie
Translated by Marion In English and German
Thanks Marion.
Click on the flag for the translation.This tutorial was made with PSP 9 but can be done with other versions of Psp.
Any resemblance with an existing lesson is a coincidence
Thanks to the tubsters for the beautiful material
Without them, this lesson would not be possible.
The copyright belongs to the original artist. Leave credit with the creator.

Take me with you, I'll show you where you left off.
![]()
Open the tubes in a map of your choice or in the program PSP.

1. Open the color palette.
Preparation
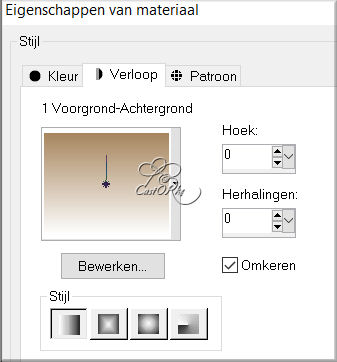
-Material Properties:
2.
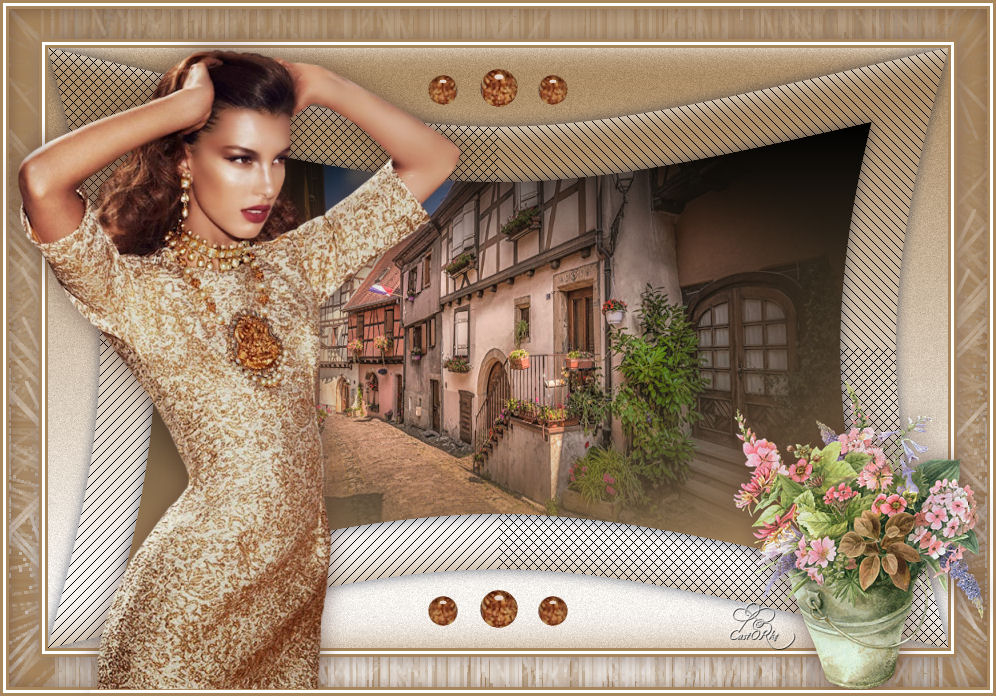
Color 1 (FG-Color #a7865d) Color 2 ( BG-Color #ffffff (white) ) Color 3 #4b2a21, Color 4 #000000(black)3. File-Open a new transparent image in this size : 900 X 600 Pixels
4. Replace your Foreground color with a Foreground/Background Linear Gradient configured like this
Angle 0, Repeats 0, Invert Checked.
5. Flood Fill Tool – Fill the layer with the Gradient
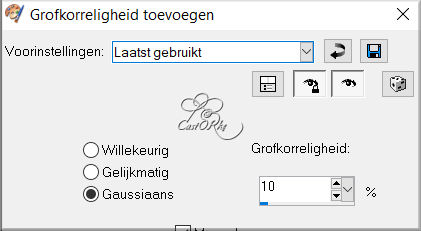
6. Adjust-Add/Remove Noise-Add Noise -Gaussian use the settings below 10
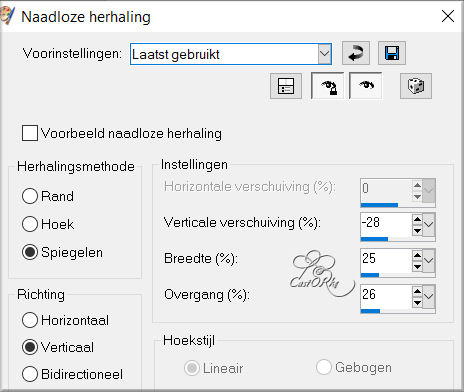
7. Effects- Image Effects- Seamless Tiling use the settings below.
8. Layers-Duplicate
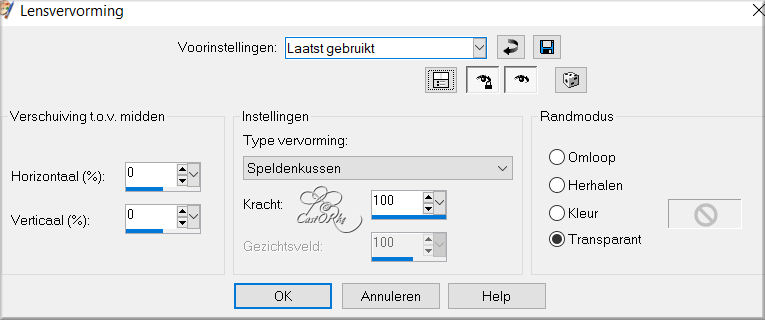
9. Effects-Distortion Effects-Lens Distortion with these settings…
-Pincushion , Strenght 100, Transparent.
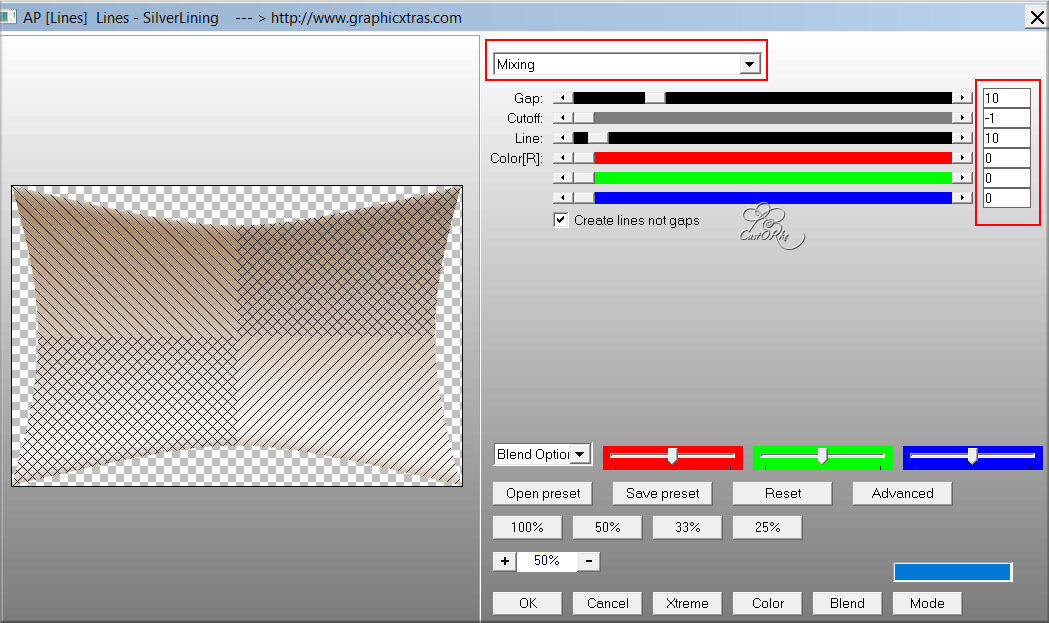
10. Effects-Plugins-AP [Lines] silverlining.
MIXING use the settings below :10 -1 10 0 0 0
11. Selections- Select All
12. Selections- Float
13. Selections-Defloat
14. Selection-Madify-Contract with 55 Pixels
15. Layers-New Raster Layer.
16. Material Properties: Set your Foreground color to color 3
17. Set your Background color to color 1
18. Replace your Foreground color with a Foreground/Background Linear Gradient with the same settings.
Flood Fill Tool- Fill the selection with the Gradient.
19. Selection remains active.
20. Layers-New Raster Layer.
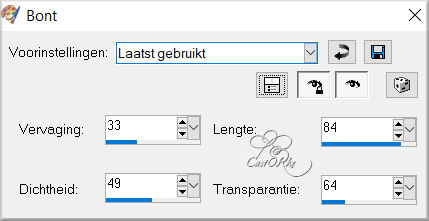
21. Open the tube : _Eguisheim_Street_tubed_by_thafs
22. Edit - Copy- Activate your work -Edit - Paste into Selection
23. Layers- Duplicate.
24. Layers- Merge- Merge Down
25. Edit-Repeat - Layers- Merge- Merge Down
26. Effects-3D-Effects-Drop Shadow with these settings: 0, 0, 60, 35 Color 3
27. Layers- New Raster Layer
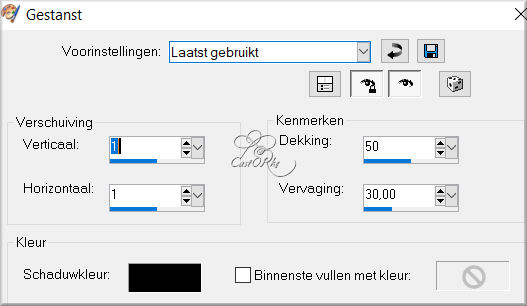
28. Effects-3D-Effects-Cutout use the settings below-Color 3
29. Selections- Deselect All
30. In the layer palette-Activate Copy of Raster 1
31. Effects-3D-Effects-Drop Shadow with these settings: 0, 0, 60, 35 Color 3
32. Image - Add Borders-Symmetric checked: 3 Px Color 1
33. Image - Add Borders-Symmetric checked: 3 Px Color 2
34. Image - Add Borders-Symmetric checked: 3 Px Color 1
35. Selections-Select All
36. Edit-Copy
37. Image - Add Borders-Symmetric checked: 30 Px Color 1
38. Selections- Invert
39. Edit-Paste-into Selection
40. Adjust-Blur- Gaussian Blur-Radius 15
41. Effects-Texture Effects -Fur use the settings below
42. Effects- Edge Effects-Dilate
43. Layers- New Raster Layer
44. Effects-3D-Effects-Cutout with the same settings-Color 3
45. Selections- Deselect All
46. Image - Add Borders-Symmetric checked: 3 Px Color 1
47. Image - Add Borders-Symmetric checked: 3 Px Color 2
48. Image - Add Borders-Symmetric checked: 3 Px Color 1
49. Open the tube : Min@-woman1067.14
50. Edit - Copy- Activate your work -Edit - Paste as new layer
51. Image Resize- 80%
Resize all layers-not checked
52. Pick Tool: (K) on your keyboard -Enter these parameters on the toolbar
Position X 13 - Position Y 23
53. Effects-3D-Effects-Drop Shadow with these settings: 0, 0, 60, 35 Color 3
54. Open the tube : animaatjes-bloemen-014725341
55. Edit - Copy- Activate your work -Edit - Paste as new layer
56. Image Resize- 80% -and repeat one time
Resize all layers-not checked
58. Effects-3D-Effects-Drop Shadow with these settings: 0, 0, 60, 35 Color 3
59. Image - Mirror - Mirror Horizontal (Image - Mirror in older versions of PSP)
60. Pick Tool: (K) on your keyboard -Enter these parameters on the toolbar
Position X 710 -Position Y 355
61. Effects-3D-Effects-Drop Shadow with these settings: 0, 0, 60, 35 Color 3
62. Open the tube: castorke_deco_les195
63. Edit - Copy- Activate your work -Edit - Paste as new layer
64. Pick Tool: (K) on your keyboard -Enter these parameters on the toolbar
Positie X 428 - Position Y 592
65. Layers- Duplicate
66. Pick Tool: (K) on your keyboard -Enter these parameters on the toolbar
Position X 428 - Position Y 70
67. Add you watermark on new layer
68. Layers- Merge- Merge All ( flatten)
69. Save as JPG
Please send it to me in original size.


Copying this lesson, in whole or in part,
without the author's permission is prohibited.
The lessons are registered with TWI.

©Webdesign Diane